This document describes the procedures for configuring or installing an Agent node from scratch.
Quick Configuration #
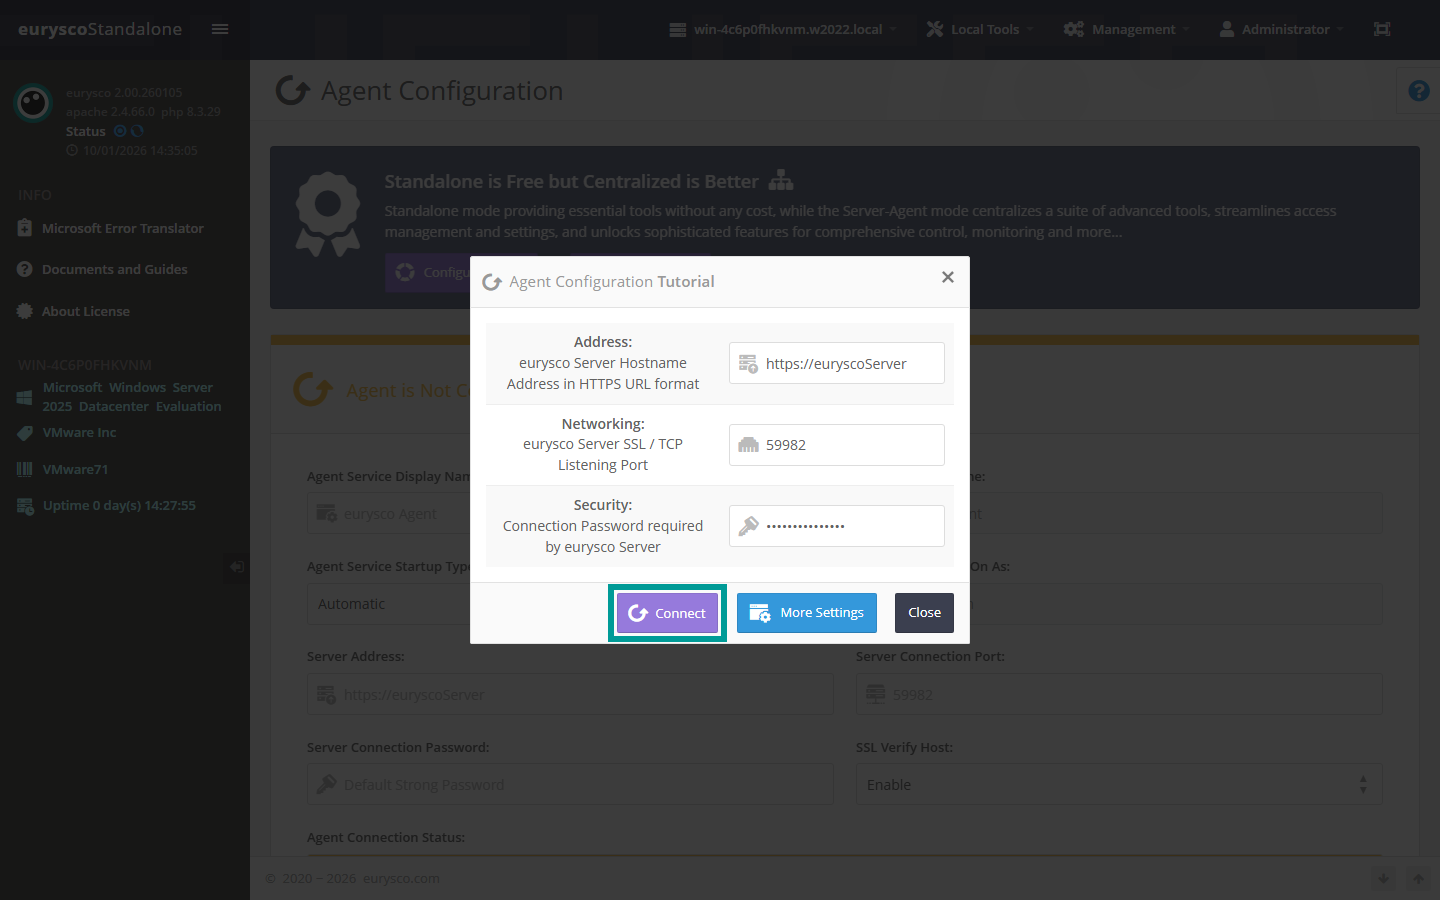
Click the Configure Agent button to configure the Agent role in a few simple steps.
Set server address, TCP port, server password and click on the Connect button.
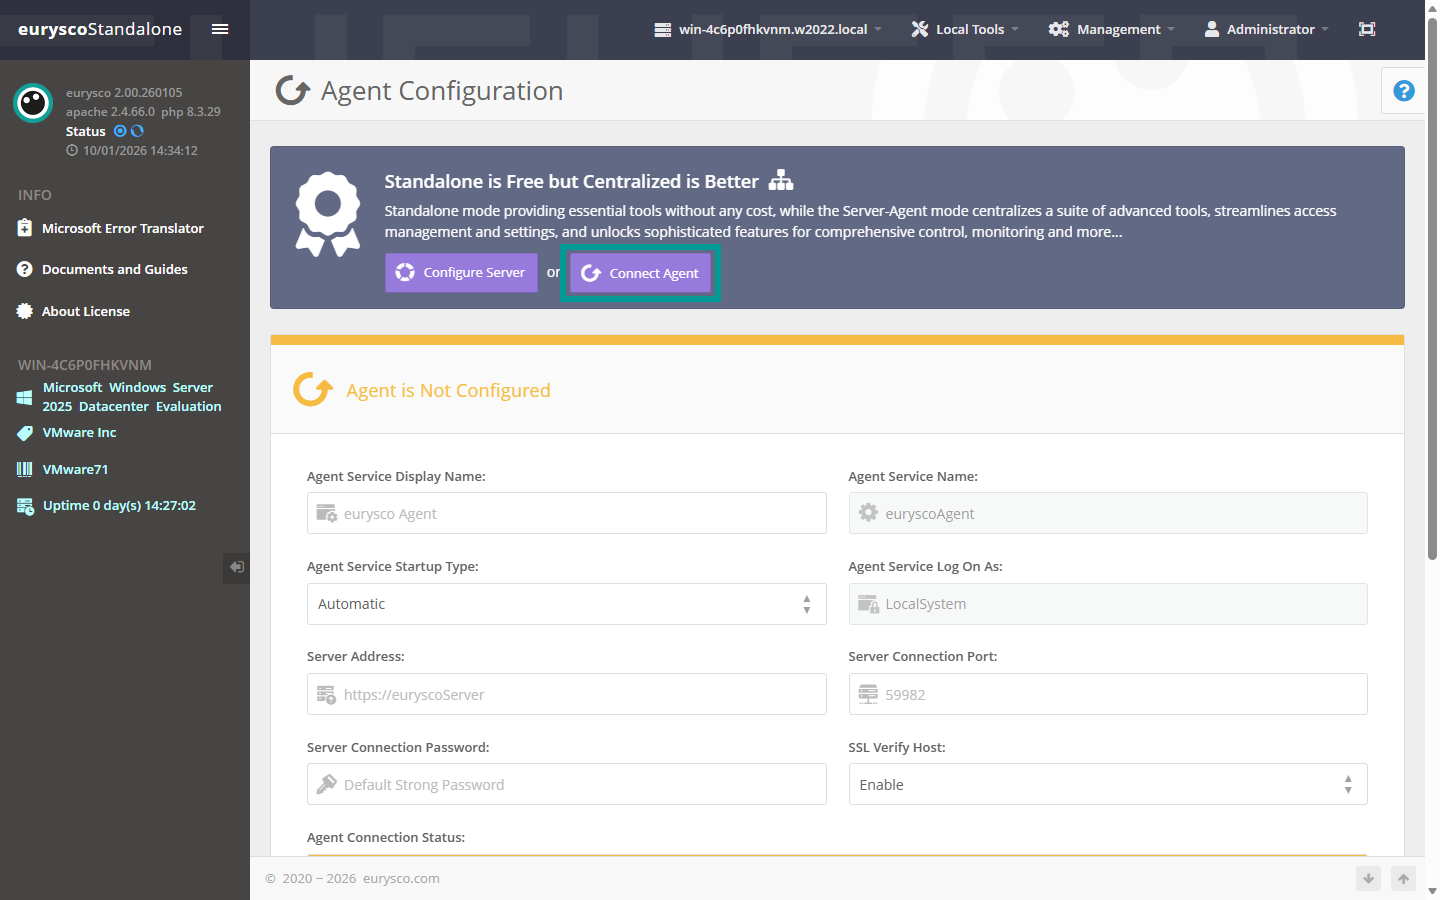
Standalone: Agent Configuration #
Any eurysco Standalone node can be configured to communicate with a eurysco Server. Below are the steps required to configure the Agent role.
-
Standalone: Agent Configuration Interface #
Open the Agent configuration interface from the Management – Agent Configuration menu.

-
Standalone: Server Address #
Set the FQDN address or Alias CNAME in URL format of the eurysco Server in Server Address field.

-
Standalone: Server Connection Port #
By default, the TCP network port of the Server service is 59982. Set the field with the alternative TCP port that has been set on the eurysco Server.

-
Standalone: Server Connection Password #
If previously set on the eurysco server, set the Server Connection Password field correctly.

-
Standalone: Create Agent #
Click on the Create Agent button once all the required fields have been set and check that the Connected status appears in the Server Connection Result field.

-
Standalone: Proxy Settings #
If required, the eurysco node can communicate with the servers through a proxy. Open the Proxy configuration interface from the Management – General Settings – Proxy Settings menu by filling in the following fields, saving the settings and testing them using Test Proxy button.
Proxy Address: [String Field] Define the URL address of the proxy to be contacted by the eurysco agent.
Proxy Port: [Numerical Field] Define the network communication port of the proxy.
SSL Verify Host: [Selection Field: Enable|Disable] Set the option to Enable to activate the host name verification during the SSL communication handshake process.
SSL Verify Peer: [Selection Field: Enable|Disable] Set the option to Enable to activate mutual verification during the SSL communication handshake process.
Proxy Type: [Selection Field: HTTP/S|SOCKS5|SOCKS4] Select the type of Proxy.
Authentication: [Selection Field: BASIC|NTLM|GSS-API|NONE] Select the type of authentication to be performed with the proxy.
Username: [String field] Define the user with which to authenticate to the proxy if required by the type of authentication.
Password: [Password field] Define the password of the user with which to authenticate to the proxy.

-
Standalone: Connect Using Proxy #
Go back to the Agent configuration interface from the Management – Agent Configuration menu and enable the Connect Using Proxy setting and click Edit Agent to save the settings.

Full Package: Agent Installation #
The complete package allows you to configure the Agent right from the installation phase.
-
Full Package: License Agreement #
Run the package with administrative rights, viewing and accepting the license to continue the installation.

-
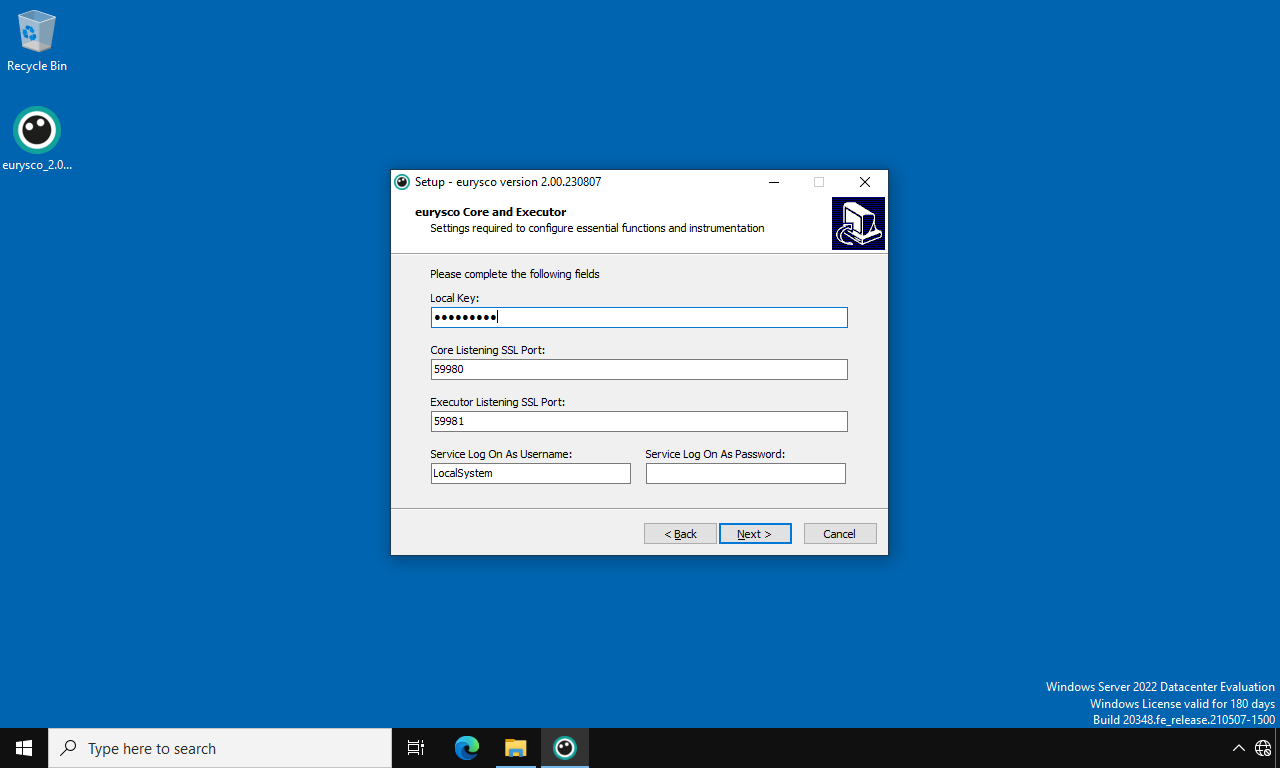
Full Package: eurysco Core and Executor #
The following fields define the basic security and the ports exposed by the eurysco interactive console of this specific node.
Local Key: [String Field] Choose and set the Local Key of the installation by keeping it safe in your password manager or in a physical safe, this will allow you to segregate your eurysco infrastructure (server node, agent nodes and standalone nodes) from other implementations. Recommended to set it in the case of a production eurysco infrastructure.
Core Listening SSL Port: [String Field] Define the TCP network communication port to access the eurysco interactive console. If it’s empty, the default port is 59980 for the Core service.
Executor Listening SSL Port: [String Field] Define the TCP network communication port to access the eurysco interactive console. If it’s empty, the default port is 59980 for the Executor service.
Service Log On As Username: [String Field] Define the user that will run eurysco services. By default the services will be configured with the LocalSystem (SYSTEM) account.
Service Log On As Password: [Password Field] Define the password of the user that will run eurysco services. In the case of the LocalSystem (SYSTEM) account, it will be empty.
-
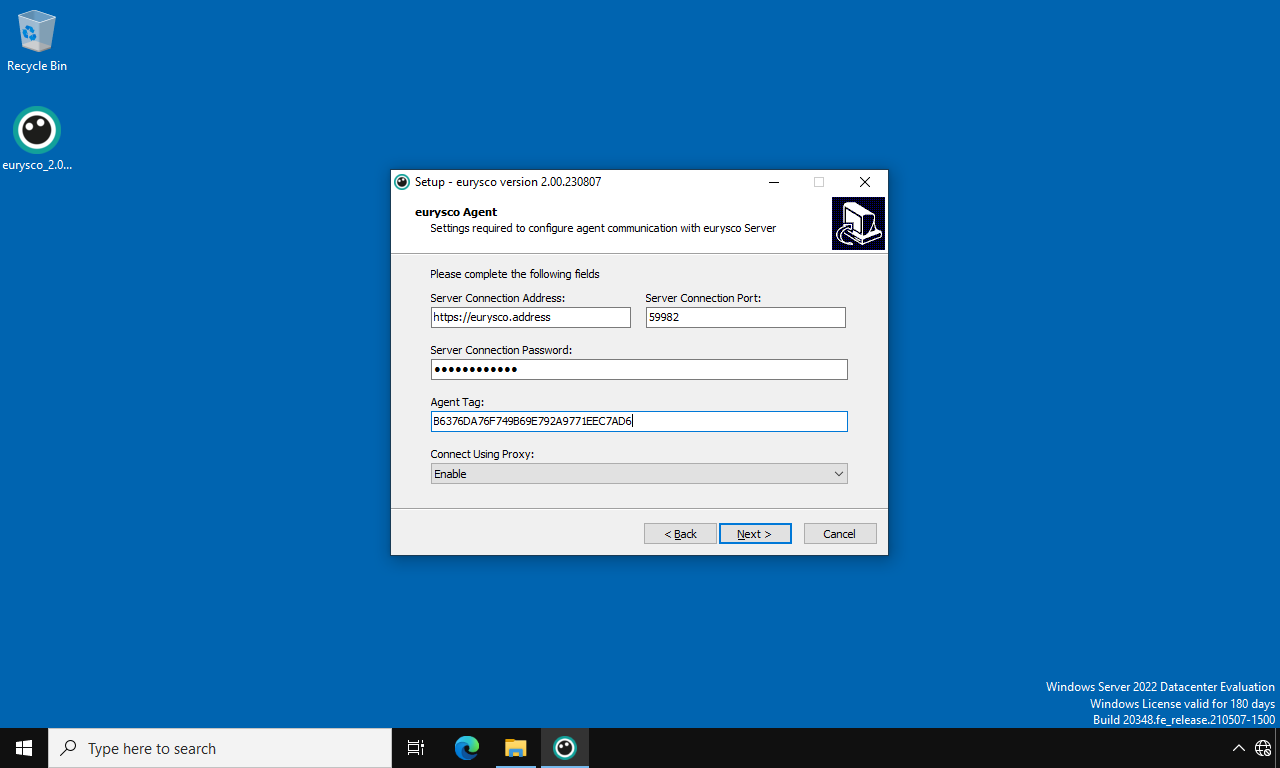
Full Package: eurysco Agent #
The following fields are used to connect this node to a eurysco server. Leave the fields empty and go to the next step to set the node in standalone mode.
Server Connection Address: [String Field] Define the URL address to configure the agent and connect it to the eurysco server.
Server Connection Port: [String Field] Define the network communication port for configuring the agent and connecting it to the eurysco server. By default the network port will be 59982.
Server Connection Password: [Password Field] Define any password to configure the agent and connect it to the eurysco server.
Agent Tag: [String Field] Set the field with the ID of the Tag to which you want to link the node. Leave the field empty to bind it by default to the Tag Global.
Connect Using Proxy: [Selection Field: Disable|Enable] Set the option to Enable if you want to access the next proxy settings configuration screen, allowing the agent to communicate with the eurysco server through the desired proxy.
-
-
Full Package: Proxy #
The following fields instruct the eurysco agent to contact the eurysco server through the desired proxy. This settings tab is only available if you have set the Connect Using Proxy option to Enable.
Proxy Address: [String Field] Define the URL address of the proxy to be contacted by the eurysco agent.
Proxy Port: [Numerical Field] Define the network communication port of the proxy.
SSL Verify Host: [Selection Field: Enable|Disable] Set the option to Enable to activate the host name verification during the SSL communication handshake process.
SSL Verify Peer: [Selection Field: Enable|Disable] Set the option to Enable to activate mutual verification during the SSL communication handshake process.
Proxy Type: [Selection Field: HTTP/S|SOCKS5|SOCKS4] Select the type of Proxy.
Authentication: [Selection Field: BASIC|NTLM|GSS-API|NONE] Select the type of authentication to be performed with the proxy.
Username: [String field] Define the user with which to authenticate to the proxy if required by the type of authentication.
Password: [Password Field] Define the password of the user with which to authenticate to the proxy.

-
-
-
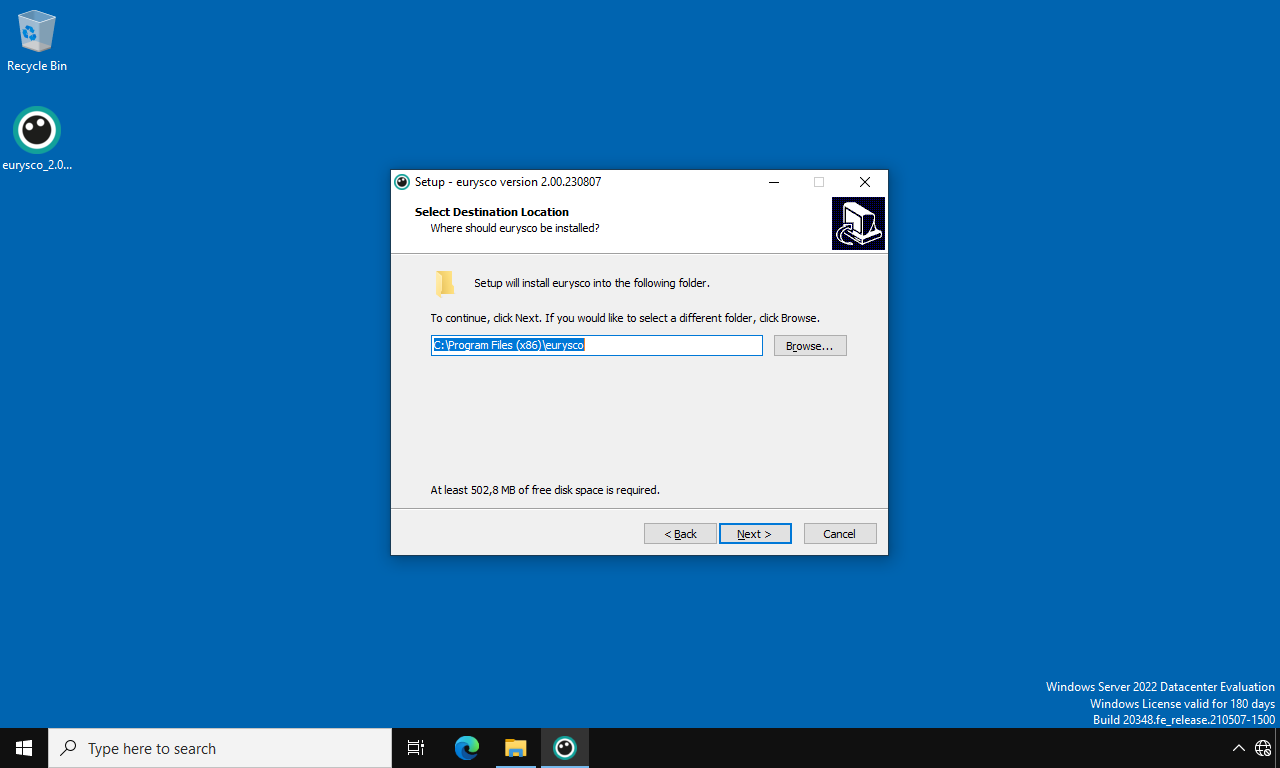
Full Package: Select Destination Location #
The following field defines the eurysco installation path. Leave the field pre-filled and go to the next step to install it in the default folder.
-
Full Package: Select Start Menu Folder #
The following field defines the name of the folder in the Start menu. Leave it and go to the next step to create the folder with the default name.

-
Full Package: Ready to Install #
Check the settings relating to the installation folders and proceed to the next step by clicking on the Install button to proceed with the installation.

-
Full Package: Completing #
Log in to the eurysco console for the first time using the following credentials…
username: Administrator
password: Administrator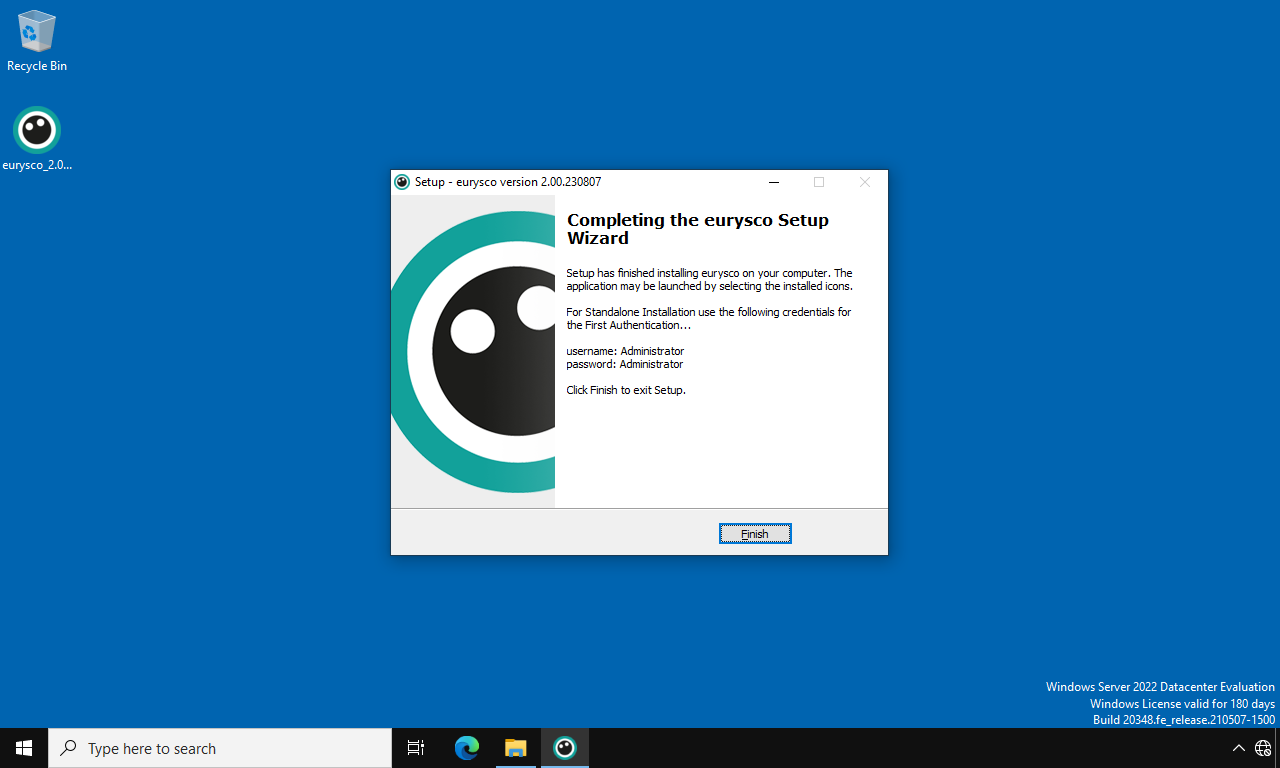
Agent Only: Agent Installation #
The package allows you to install and configure only the Agent, without the interactive console (GUI) and related tools that cannot be centralized on the Server in exchange for a consumption of resources reduced to a minimum and a reduced attack surface.
-
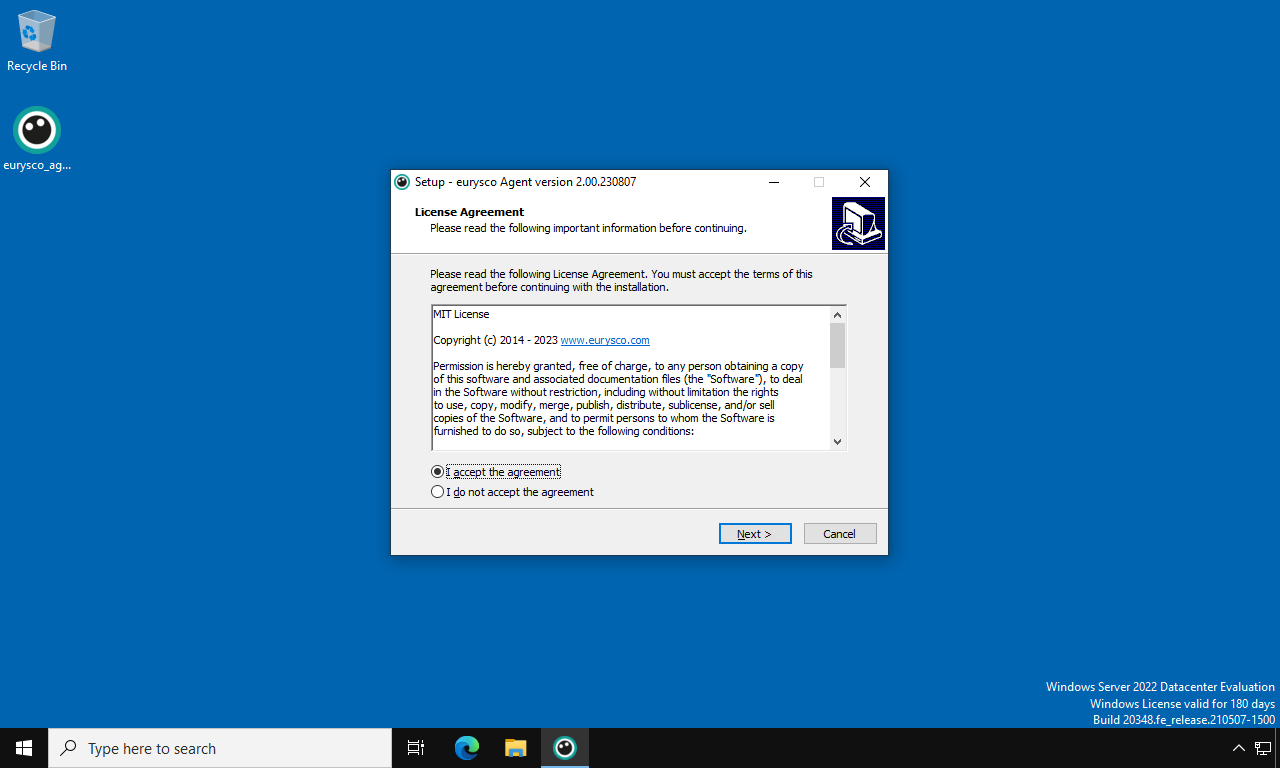
Agent Only: License Agreement #
Run the package with administrative rights, viewing and accepting the license to continue the installation.
-
Agent Only: eurysco Local Key #
The following fields define the basic security.
Local Key: [String Field] Choose and set the Local Key of the installation by keeping it safe in your password manager or in a physical safe, this will allow you to segregate your eurysco infrastructure (server node, agent nodes and standalone nodes) from other implementations. Recommended to set it in the case of a production eurysco infrastructure.
Service Log On As Username: [String Field] Define the user that will run eurysco services. By default the services will be configured with the LocalSystem (SYSTEM) account.
Service Log On As Password: [Password Field] Define the password of the user that will run eurysco services. In the case of the LocalSystem (SYSTEM) account, it will be empty.

-
Agent Only: eurysco Agent #
The following fields are used to connect this node to a eurysco server. Leave the fields empty and go to the next step to set the node in standalone mode.
Server Connection Address: [String Field] Define the URL address to configure the agent and connect it to the eurysco server.
Server Connection Port: [String Field] Define the network communication port for configuring the agent and connecting it to the eurysco server. By default the network port will be 59982.
Server Connection Password: [Password Field] Define any password to configure the agent and connect it to the eurysco server.
Agent Tag: [String Field] Set the field with the ID of the Tag to which you want to link the node. Leave the field empty to bind it by default to the Tag Global.
Connect Using Proxy: [Selection Field: Disable|Enable] Set the option to Enable if you want to access the next proxy settings configuration screen, allowing the agent to communicate with the eurysco server through the desired proxy.

-
-
Agent Only: Proxy #
The following fields instruct the eurysco agent to contact the eurysco server through the desired proxy. This settings tab is only available if you have set the Connect Using Proxy option to Enable.
Proxy Address: [String Field] Define the URL address of the proxy to be contacted by the eurysco agent.
Proxy Port: [Numerical Field] Define the network communication port of the proxy.
SSL Verify Host: [Selection Field: Enable|Disable] Set the option to Enable to activate the host name verification during the SSL communication handshake process.
SSL Verify Peer: [Selection Field: Enable|Disable] Set the option to Enable to activate mutual verification during the SSL communication handshake process.
Proxy Type: [Selection Field: HTTP/S|SOCKS5|SOCKS4] Select the type of Proxy.
Authentication: [Selection Field: BASIC|NTLM|GSS-API|NONE] Select the type of authentication to be performed with the proxy.
Username: [String field] Define the user with which to authenticate to the proxy if required by the type of authentication.
Password: [Password Field] Define the password of the user with which to authenticate to the proxy.

-
-
-
Agent Only: Select Destination Location #
The following field defines the eurysco installation path. Leave it and go to the next step to install it in the default folder.

-
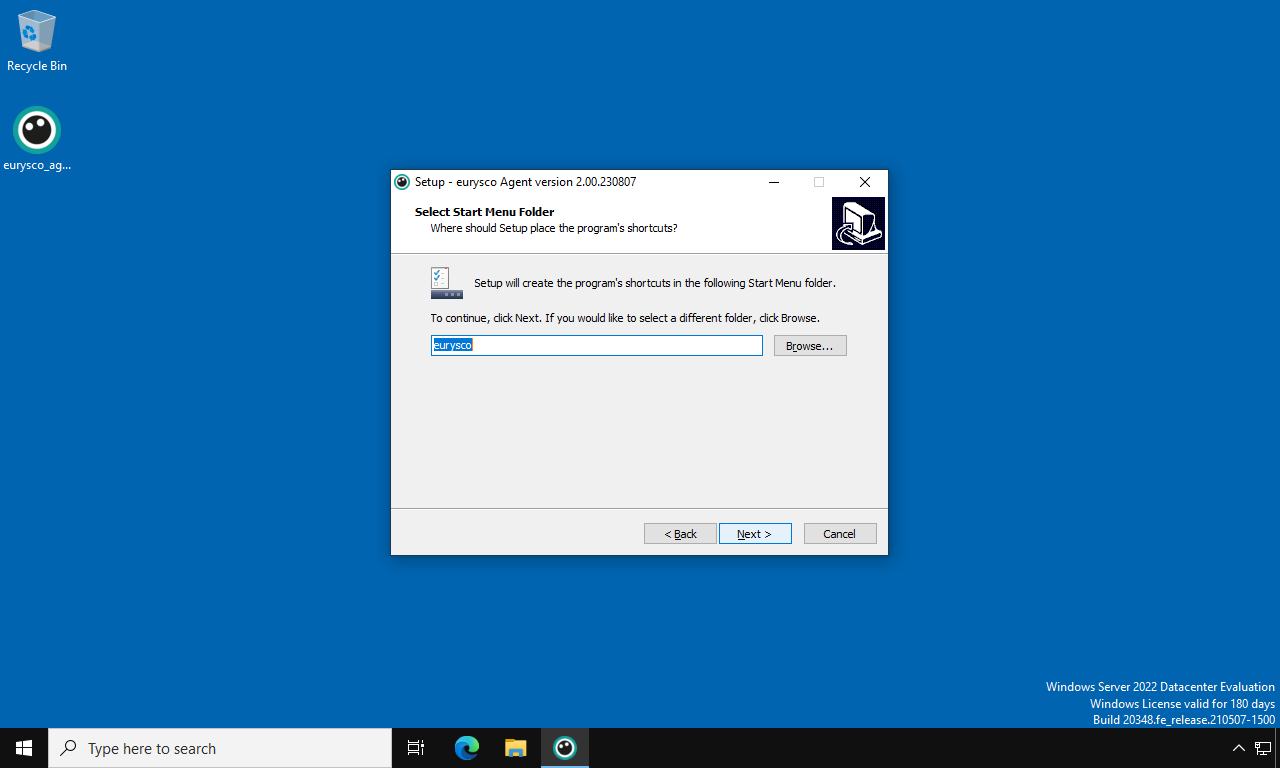
Agent Only: Select Start Menu Folder #
The following field defines the name of the folder in the Start menu. Leave it and go to the next step to create the folder with the default name.
-
Agent Only: Ready to Install #
Check the settings relating to the installation folders and proceed to the next step by clicking on the Install button to proceed with the installation.

-
Agent Only: Completing #
Installation Completed.
